Distribution roadmap and timings
1. Activate your Sellers✅
You will find more information on our Auto-Activations process here. If you are going to start only with your own direct portfolio (static rates), you can jump straightly to the next step.
2. Inventory Setup🛠️
You will find more information on Inventory Setup here. The Inventory Setup step will be required in three scenarios:
- Uploading your direct portfolio (static rates): since it is your direct portfolio, you should keep availability and prices updated manually.
- Connecting Channel Managers
- Both
3. Hotel-X Mapping🏨
Our Distribution solution is multi-layered, with the Hotel-X API being one of its key components. This API consolidates all your products, both direct and third-party, enabling you to distribute them to your Buyers.
To facilitate this, the Hotel-X API needs to know the correlation between your unique codes and those of the Seller.
-
FTP access and credentials
You can access our FTP from any FTP application by configuring the following information:
-
- Port: 21
- Host: ftp.xmltravelgate.com
- Credentials: Provided to the Organization Owner at TravelgateX.com, along with the Welcome Email (from: jenkins-ci)
-
Hotel-X Mapping files
Hotel-X utilizes six mapping files to enhance the accuracy of your aggregation. We suggest starting with at least the following:
-
- Hotel Map
- Board Map
- Room Map
How can I upload my mapping files to the FTP?
Our mapping formats share a common structure, so you just need to follow the instructions below:
-
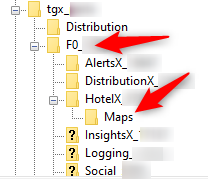
- Create the Mapping Directory: Unfold your Organization folder and click in the "F0_" folder. Then, click in the "HotelX_" folder and create the "Maps" folder. The "Maps" folder will be the one where you will have to allocate all the mapping files.
-
- Hotel-X Mapping Files format: You should follow the below format when generating the mapping files:
-
-
- File Name: [Context Source]_[Context Destination]_[entity]_map.csv
- Context Source: it corresponds to your own codes
- Context Destination: it corresponds to the supplier code
- 1 file for each Supplier
- Header Row: Code Source, Code Destination
- Code Source: it corresponds to your own codes
- Code Destination: it corresponds to the supplier codes
- Delimiter: Comma (“,”)
- Directory: /F[folder code]_[unique code]/HotelX_[unique code]/Maps/[entity]/
- File Name: [Context Source]_[Context Destination]_[entity]_map.csv
-
File names:
-
- Hotel Map: [Context Source]_[Context Destination]_hotel_map.csv
- Board Map: [Context Source]_[Context Destination]_board_map.csv
- Room Map: [Context Source]_[Context Destination]_room_map.csv
-
Master files definition
With the Master files, you can easily customize the Static Content that your Buyers will download when they connect to you. This includes your own codes for hotels, rooms, boards, and more.
There are up to 10 master files, but we suggest starting with at least the following:
- Hotels
- Rooms
- Mealplans
Master files directory
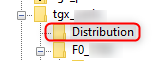
You should upload the Master files into the Distribution folder as per below:
Master files format
You should follow the format detailed for each of them:
We have introduced a new feature that allows you to upload your Master and Mapping files directly from our website using our Distribution APP. It's now easier than ever to manage your files. Don't forget to give it a try!🚀
4. Distribution Setup🛠️
In order to connect your first Buyer, it is necessary to create the Agency or Agencies that will represent your Buyer's credentials in our Distribution Extranet. Once the agency is created, you will have the ability to configure the Distribution Rules that apply to that specific Agency.
5. Activate your Buyers and sell your product🚀
Now, all that's left is to request the activation of the Buyers you have an agreement with through our Connect Form:
- In order to request the activation you should first retrieve the user and the access token from our Distribution extranet:
-
- User: It is the ID of the Agency you created for the Buyer you want to connect:

- User: It is the ID of the Agency you created for the Buyer you want to connect:
In case of multiple accesses for the same Buyer (e.g. B2B/B2C), you should repeat this process for each of them.
-
- Access Token: Automatically generated once you create the Agency, it can be obtained by clicking in the "Token" button:

- Access Token: Automatically generated once you create the Agency, it can be obtained by clicking in the "Token" button:
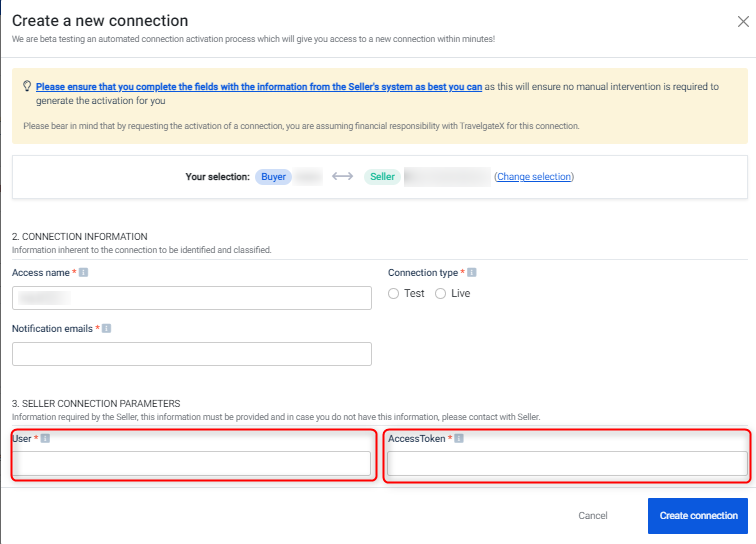
- Request the activation through our Auto-Activations form - make sure you add the user and access token to the form
Once you click in New Connection (more information here). Remember to add the User and Accesstoken to the form:
- Create a test hotel and set up your product!
Check out our articles How to connect to a Channel Manager via TravelgateX and How to set up and load product in Inventory for further information.
Don't forget to check our Documentation in order to learn all about Distribution and make the most of your connections!